Classroom management is one of the most difficult and challenging things in the sphere of teaching. It can be especially challenging when you are a new teacher and when you are working with young learners and/or teenagers. Fortunately, teachers of adult classes seldom come across this issue.
There are two types of classroom noises — “disruptive noise” and “creative noise”. By “disruptive noise” we mean the one that does not emerge from a working process. In other words, it is the noise that students create when they are not busy working on classroom tasks, group work, discussion, etc. “Creative noise”, as you can already guess, is quite the opposite. It is the type of noise that builds up when students are discussing a topic or brainstorming some ideas. If you have “creative noise” in your classroom — CONGRATULATIONS! Your students are involved in the class.
Here are some ways to make sure that the level of noise in the classroom, disruptive or creative, doesn’t get out of hand.
Interesting sessions
The best way to ensure that the students are involved in the class, into the learning process and are improving their competency in the subject, is to prepare interesting lessons. By interesting lessons, we mean the following:
The topic — though most of the ESL books are unit-based and have a series of activities to go with, we should always try to adapt it according to our students’ interests and learning needs. Completing the book from A to Z has never guaranteed success in learning. If the topic is interesting the students will not dwell onto other discussions.
The materials — though the topic choice can be great, lesson materials should be equally well designed. It is surely easier to prepare one handout and ask the students to complete exercises 1-10 but it will bore both you and the students to death. To make it more interesting, it’s better to use PowerPoint presentations, coloured papers, stickers, etc.
Classroom management
Honing our skills in classroom management is another key to controlling the noise level. By classroom management, we mean the seating of the class, the grouping of the students, student involvement, etc.
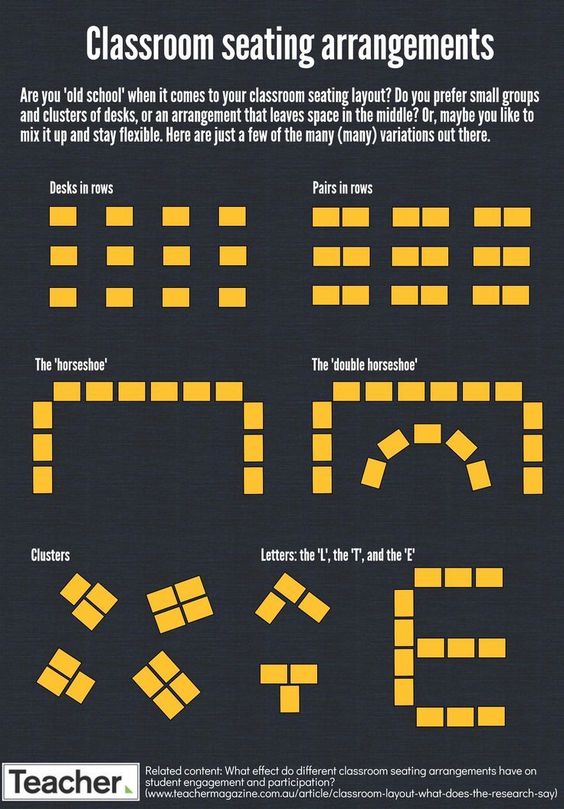
The sitting of the class — there are different classroom arrangements. Each has its advantages and drawbacks. Personally, I favour the U shape sitting, as it gives everyone a chance to see each other. See some other seating arrangement below.

(Source: pinterest.es)
Grouping — assigning pairs and groups to work with each other is also quite a hard task. To do this successfully, you need to know your students very well. This can be challenging in the first month of teaching. Students have a habit of sitting next to ones they are friends with. This can trigger out of context discussion and misuse of the class time. To avoid this, make sure to change the seating of the students every now and then. I used to do this every day in the first week of teaching, firstly randomly, by pulling out student names and grouping them together in 3s or 4s. This gave me a chance to see who works well with who and who disturb each other. After figuring this out, I started to do it each week by preparing a seating chart with the student names and posting it on the classroom door. Another advantage of changing seating arrangement is that all the students will have a chance to work with each other and you will not always have strong or weak students grouping separately.
Student involvement — this is especially a good thing to remember if students are working in groups of 3 and more. In this case, the tendency is for a couple of students to lead the discussion and the rest just follow or listen. To make sure everyone is involved and feels responsible to follow the task, assign roles to the group members, e.g. the leader, the introducer, the summarizer, the note taker, etc. Later on, by the end of the activity, when you want to ask for feedback, choose the students who were more passive during the discussion and ask them to summarize the activity. This will give them a chance to take responsibility for their class time. Read more about classroom management here.
Noise monitoring applications
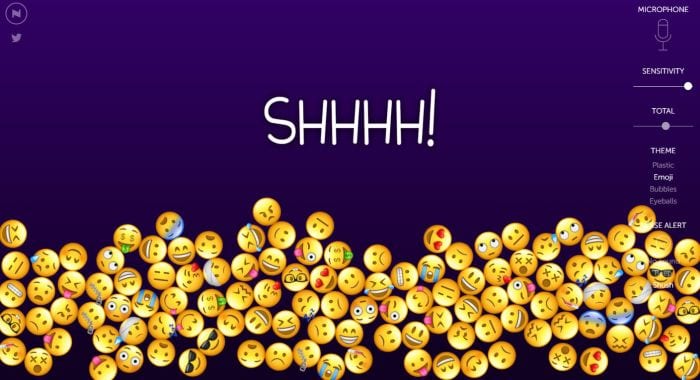
If you have created a healthy classroom environment and want to teach your students to better manage their own noise level, you can use a number of online noise monitoring tools to ease your job. Just show the application to the students and explain to them how it works. I am using the Bouncy Balls.

It is a simple, free noise meter that can be used in the classroom. As sounds increase, plastic balls, emoji, bubbles, or eyeballs shoot up from the bottom of the screen and move erratically until levels decrease. Use Bouncy Balls during group work when high noise levels can distract students. Here the students need to speak lower if the balls are jumping high. This is a great way of teaching young learners and teenagers not just the subject but some self-management skills as well.
Some other noise measuring apps:
- Too Noisy Pro. Too Noisy Pro is targeted at places like schools or daycares, that have a large group of kids that interact and make noise. The app has a pretty warm and welcoming user interface that has a happy and smiling graphic whenever the noise is kept within the limit, but when the kids begin to overshoot the limit the graphic changes to reflect that, and if they maintain such over the top noise for more than 3 seconds an audible alarm goes off.
- Classcraft Classroom Noise Monitor. A volume meter appears on the screen, changing to reflect the amount of noise in the classroom. If the noise crosses the max line, a pop-up on the screen states that you’ve been too loud. There’s no audible alert, only the visual warning. You can set a timer at the beginning if you like, turning this into a game to see if you can find the buried treasure without any noise violations.
- Zero Noise Classroom by Google Chrome. Zero Noise Classroom is a Chrome extension, so you’ll need to use the Chrome browser. You set a timer for this classroom noise monitor, and current sound levels appear in the background as it runs. Light shades indicate quiet, while darker grey means the classroom has gotten louder. When a red stripe displays, it means the noise has passed the maximum level (there’s no audible alert). Because this classroom noise monitor displays the “noise history” from start to finish, it’s a fun way to see just how often a class is passing the noisy threshold. Try it as a challenge: If a class can finish 30 minutes of group work without hitting the red a single time, they earn a prize.


 Маргарита Аветисян
 Вероника Аветисян


